
With the recent CDC protocol concerning face masks in public, a lot of people have recently been putting in work to make their face masks. The instructions in this post will teach you how to make fabric face masks accompanied by fabric ties or elastic ear loops. If you can’t also find elastic, you can also go with the less common fabric tie too.
Are Homemade Face Masks Helpful During Pandemic?
They are! The CDC recommends the use of sewn masks and they claimed this can also stop the spread of most diseases. Mask makers are now looking for blueprints to make surgical types of masks at home for their hospitals, families, and loved ones.
Overall, face masks and coverings have skyrocketed in demand and since most disposable masks are now rare to find, people have resulted in making their masks as a protective measure when going out. They are perfect for cases where social distances are almost impossible.
There is also a high demand for safety equipment by healthcare workers and according to the CDC, “cloth masks are recommended for emergency use when other options are not made available”.
Homemade Reusable Face Masks vs Medical Face Mask
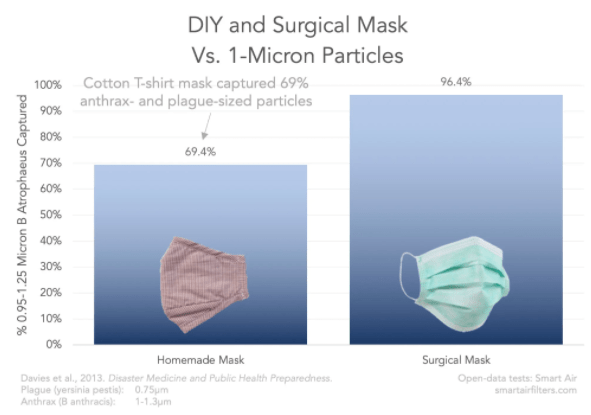
Late last year, November precisely, researchers from Virginia tech released a paper on the effectiveness of surgical masks, cloth masks, and face shields. The work hasn’t been peer-reviewed since it was posted to the preprint server medRxiv.
Researchers found out that you don’t need a surgical mask or a PPE to keep you safe. A homemade reusable face mask can work just right but a few options have to be made right while choosing one.
The first is that your homemade cloth mask has to be made with three layers of filtering material. Then preferably choose one with ties and not ear loops and lastly go for a flexible material that would cling onto your face.
Medical face masks on the other hand have long been worn by nurses, doctors, and health care workers in single-use and they have been around for over six decades.
Quoting the FDA, “a surgical mask is a loose-fitting, disposable material that creates a barrier between the nose and mouth of the user and potential contaminants in a given environment”.
They are quite known as “face masks” but they undergo specific regulations that reusable face masks don’t. A very incredible component that is overlooked by users is the metal strip which is integrated into the bridge of the nose. This feature is hardly found in cloth masks.
Common Mask Patterns and Templates
For those interested to make their face mask, the choice is unlimited, and there are countless mask styles one can choose from. Some may take few minutes to make, while others are more complex and need more skills to master.
To know a good style, the fit is important. It should reach above your nose and below the chin. Now let’s look at the four most common styles of masks and how to sew them.
Plated rectangular face mask
The plated rectangular face mask is the most basic style of mask you can find. Just as the name implies, it is rectangular and at the center, it has pleated features which make it easy to fit over the mouth. This may be the simplest form of face mask you can make.
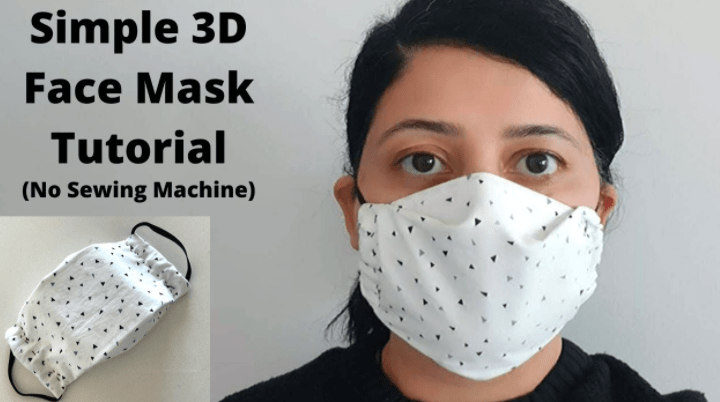
3D face Mask
The 3D face mask is a more protective face mask that; doesn’t sit right on your face making it more comfortable. This style of homemade face mask looks like a Japanese or origami mask style. Since this mask folds out and sits on your face, it would give you more room to breathe.
Olson Face Mask
This type of mask is amongst the 4 most common patterns of face mask you can make at home. It was designed by medical professionals to be used when N95 masks, and surgical masks, are not available. It is curved to somehow fit the mouth and the nose area and you can also create a pocket inside to fit filters if you want one.
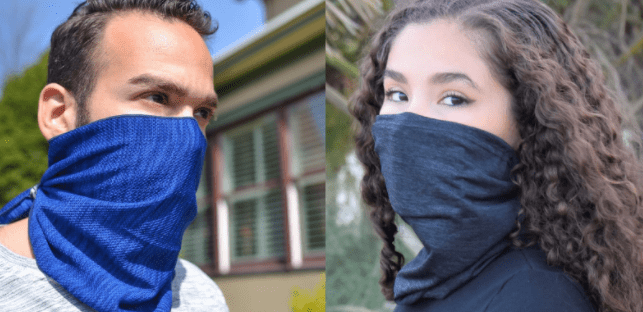
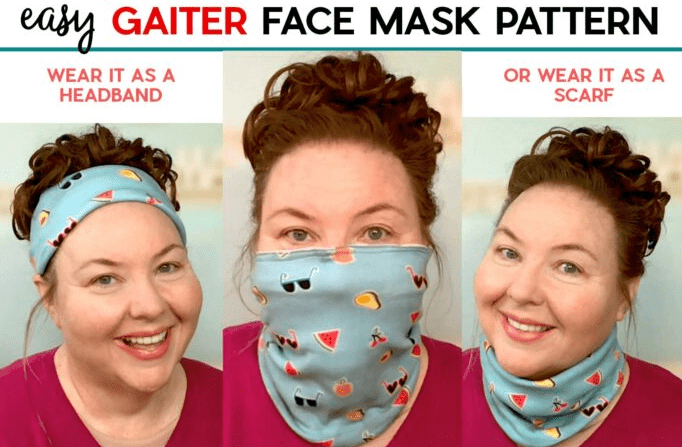
Neck Gaiter face Mask
This type of homemade face mask is common; made out of mainly knit fabric which is softer and stretchy. Most people result to using this type of mask in more than 6 different ways so it is flexible in use. You can also add a filter to this type for more protection.
How to Attach a Face Mask with Ties?
Here is a simple way to attach ties to your face masks.
● Start by selecting the type of tie you want. Your first option can be a small elastic or a sewn fabric. Some types of ties, go behind the head while others behind the ear.
● You can make ties out of old t-shirts also. Just make sure the material doesn’t slack over the time of use.
● Consider also using a bias tape if you find some laying around at home. This is more suitable if you have kids.
Below, we are looking at how we can make the 4 most common types of masks. We are going to look at what you need to prepare, how to measure out using templates, and the instructions to make each individual mask.
How to Sew a Pleated Rectangular Face Mask with Ear Hooks/Loops?
What you need to prepare

● cotton fabric (cotton is the best material to make homemade masks).
● 1/8″ flat elastic or fabric ties for ear loops.
● Ruler
● Sewing machine and thread
● Fabric scissors
● Pins and clips.
How to measure?
● To make an adult-sized mask, cut one rectangle-sized fabric which measures 16″ long and 8.5″ wide. Also, cut two pieces of elastic about 7″ long.
● To make a child-sized mask, cut about 14′ long and 6.5″ wide of fabric. Also, cut two pieces of 6″ elastic too.
Instructions
Step 1: Sew the top side, creating a pocket if you want to.
Fold your rectangular fabric in half and sew along the top edge creating a 4″ space for your pocket. Next, turn the fabric so that the seam with the mask’s pocket opening is placed at the middle of one side. Use an iron to make the seam open. Fold the excess seam in a zig-zag or a topstitch along the side to finish the edge.
Step 2: Insert and pin the elastic
Pin each elastic to each side of the mask. One end to the top of the fabric and the other to the bottom. This will give you an ear loop when you turn the mask over. The elastic piece will be covered by two layers of fabric. Repeat this step to the other side of the face mask.
Step 3: Secure the ties by sewing the sides
Using your machine, sew each side of your face mask, and backstitch over your elastic to put them firmly in place. Turn the right side out and press with an iron.
Step 4: Make the pleats
add the pleats with three evenly spaced lines. Start by measuring and marking with a fabric pen. Use these markings to create three perfect 1/2′ pleats and pin the folds down, ensuring each pleat is in sync. Sew along the pleats to secure them.
Tip: always wear the masks with the opening of the pleats facing down so it doesn’t collect any particles when in use.
How to Sew Olson Face Mask Pattern?
What you need to prepare?
● You will need a couple of items such as:
● ¼ yard of woven fabric (cotton as usual)
● About two elastic ties (you can improvise if you want to use fabric ties)
How to measure?
To get the correct size of measurement, you have to refer to the Olson face mask pattern found below.
● The first pattern is for the adult-sized Olson mask, and the template can be found here.
● The second pattern is for a kid-sized plan mask, and the template can be found here. It is in two different sizes, age 2-5 is found on page 1, while age 6-10 can be found on page 2.
If you encounter any printing issues, make sure your adobe reader is up to date and your scale is set at 100%. Do not print with mobile devices because you won’t get the right size.
Instructions
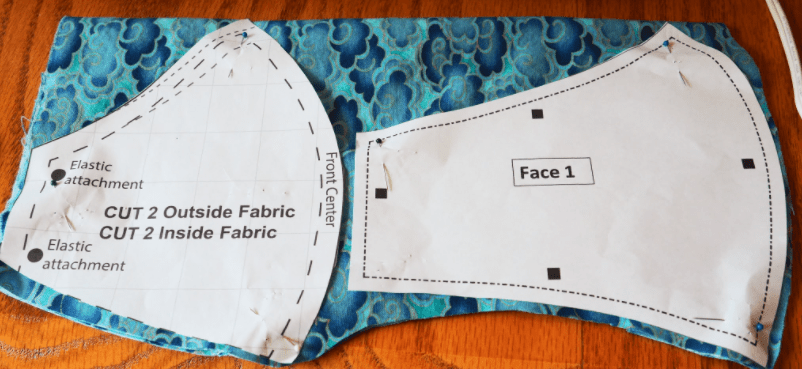
Step 1: Cut out your pieces on the fabric using the template provided.
Each template has about 6 patterns. You may even save time by cutting both sides of the face mask by using only cheek 1, face 1, and mouth
1. When going this way, make sure that the fabric is turned so the inside faces each other, then you can cut both patterns at once.
Step 2: Sew around the face edges and the curved mouth.
Start by placing the two facepieces on the right side and sewing the curved edge.
Step 3: Pin the pieces together
Place the mouthpiece and the cheekpieces on the table with the fabric print facing down. Allow the cheek pattern to overlap the top of the mouthpiece by just 1” and use pins to hold both the top and the bottom part.
Then place the pinned inside on top of the face pattern with their fabric side together. Match each piece together at the center seams and place your pins on both the top and bottom center. Line up the straight edges ad pin that too.
Now remove one of the pins that hold the cheek and mouthpiece together. Adjust the fabric so it can fit between the center and the sides, then re-pin all layers. Repeat this for all 4 pins that attach both the cheek and the mouthpiece.
Step 4: Sew the pieces together
Sew around the mask and at each corner; stop with the needle down, lift your foot and turn the fabric, then put your presser down and continue sewing. When you reach where you started, apply a backstitch to hold firmly. If you want to reduce the bulk fabric, you can remove the fabric without cutting your done stitches.
Step 5: Add your elastic or fabric ear loop/ties.
Turn the mask to the right side using one of the holes at the cheek’s area. Place one side of the edge through plastic and fold a half-inch. Sew that side and backstitch to keep it secure. Repeat this step on the other side.
How to Sew a 3D Face Mask?
What you need to prepare
● 100% cotton fabric
● Filter material (optional)
● Sewing machine
● Thread
● Nose pieces (optional)
● Elastic for ear loops
How to measure
Start by downloading the pattern required to create the 3D face mask here. Choose the size based on your age group if you have a smaller or larger face, consider scaling up or going down in size to get the best fit. You can also adjust the size of the elastic ear loop.
For the elastic loops;
● Age 3-5 – 2 pieces of 6-7” long elastic
● Age 5-7 – 2 pieces of 7-8” long elastic
● Age 8-11 – 2 pieces of 8” long elastic
● Teen/adult S- 2 pieces of 9” long elastic
● Adult M – 2 pieces of 9” long elastic
● Age L – 2 pieces of 9” long elastic
● Age XL – 2 pieces of 9” long elastic
Instructions
Step 1: Measure and cut out the fabric.
Cut out two layers of fabric with the fabric sides together, then pin it down. Sew along the top and bottom of the mask horizontally, leaving the sides of the mask open. Trim the corners to reduce bulk. Try turning the fabric print side out through the side opening.
You can topstitch along the top and the bottom areas too, and you can add your metallic strip along the top and bottom edges.
Step 2: Iron and press your fabric to shape
Using the pattern piece fold, press the top and bottom edges into shape. Center your fabric on the pattern printout and select the fold lines that go with your style. Press using an iron and topstitch along the folds on both sides.
Step 3: Adjust and fold the side edge to attach elastic.
Fold the side edge about ⅜” twice and press with iron; this will create an enclosed area for the elastic. To avoid putting the elastic later, put the elastic in the folded edge and use a pin to hold it down. See carefully along with the edge and backstitch. Tie the elastic carefully and repeat for the other edge.
Step 4: Creating the 3D fold.
To create the 3D fold, fold up the angled edge of the flap up and pin; Stitch this back and forth the pleats and ensure it firmly stays. Repeat this on the other side.
How to Sew a Neck Gaiter- Ski Face Mask?
What you need to prepare?
● ½ yard of 4 way stretchy fabric
● Sewing machine
● Iron
● Jersey needle
● Ironing board
● Fabric-Tac
● Scissors
● Nose bridge metal strip (aluminum preferably)
● Thread
How to measure?
First, begin by checking the size of the neck waiter you would like to make. If you have a smaller face, consider going for the teen size.
Below is the printable template to make the neck gaiter. Do not enlarge or reduce the scale and print with an Adobe pdf reader. This is the link.
Lay the fabric folded into half, then measure and cut on the fold while pointing the pattern in place. The fabric can be folded in half with the stretchy part running across the width.
Instructions
Step1: Cut your fabric
Cut and trim your fabric with the above pattern. Cut out two pieces if you want a lined mask and cut out your filter pocket too.
Step 2: Make the filter pocket for your neck waiter mask.
Place one mask with the fabric print side facing the table as finding the center to Mark it. Fix your filter pocket and align it to the center. When the pocket filter is aligned, sew along the bottom about ½” from the edge and sew on top the pocket about 1” from the edge of the man fabric.
Step 3: Sew the mask together
Place the fabric print side together and sew across the fabric from top to bottom. Turn the inside of the tube so that the fabric print sides facing each other would align the seams. Pin in place then sews along the raw edge giving about 2-3” opening for turning. Pull the fabric through that hole and turn them right side out.
Step 4: Close the Opening and press with an iron
Use your hand to stitch the opening close or use fabric glue to achieve the same result. Press all the seams on your mask with iron and got steam to help the fabric get back to its original size because a lot of stretching has taken place during sewing.
Step 5: Put in your nose piece and filter pocket (Optional)
You can slide in your aluminum nose piece or your filter in the filter pocket for more protection. Now you can wear your face mask.
Which Fabric is Used for Masks?
At the University of Cambridge, scientists tested the effectiveness of various forms of materials used to make homemade face masks and they concluded.
Most of these fabrics used for mass-scale production and DIY masks are mentioned below. These materials have to be capable of filtering particles as well as providing breathability to their users.
Woven fabric
One of the most used fabrics is woven fabrics and it can give partial protection to virus droplets. Examples of woven fabrics suitable for making facemasks include; cotton, polyester, flannel, silk, chiffon, linen, satin, etc.
One of the advantages these types of materials have is that they are reusable and washable. Also when using this fabric, size and proper fitting is a key factor to ensure maximum protection.
Kitted fabric
Knitted fabric facemasks have been commercialized by knitting technology providers and are manufactured in one piece. For most homemade or personal use face masks, knitted fabrics gotten from cotton shirts are a perfect material to use.
Improper fitting as a result of the shape of the face will affect its effectiveness to properly protect users. This can be solved with stretched knit fabric so the face mask can be used comfortably snugly fitting the face.
Common Mask Problems and Solutions
It is okay to recognize that putting on a mask is sometimes disturbing and uncomfortable; this means that there are some problems we might encounter. Below are some tips to help make your mask-wearing more alleviating.
● If you wear glasses and frequently experience foggy glasses, try using an anti-fog product, shaving cream, or washing your lenses with soap.
● If you feel headaches, this might be caused by ear loops being too tight and not a build-up of CO2. Consider using paper clips to connect the ear loops behind your back or make use of ties.
● If you experience difficulty in breathing, try removing masks and taking a mask break when you are safely alone or in your car. If it’s severe, stop wearing masks and make use of sanitizers instead. Also, avoid being too close to people by keeping 6ft away from them.
FAQs